How to adapt Mosaic Knitting Charts for Mosaic Crochet
Yes…. It’s Mosaic Crochet…. Again!
But I just love it too much and there is so much to explore about it!
For example, we can talk about the different variations of it:

The Mo-Mo Project Bag
This project bag uses the Single-row Mosaic Crochet in Rounds Technique. Find the pattern free in the blog.

Teotihuacan Top
My latest desing using the Single-Row Mosaic Crochet in Rounds Technique. Isn’t it gorgeous?!
2. The other one is where one row on the chart represents two rows on your work . This gives you the ability to come and go with the same color and work it flat. Like on my Brickroad Table Set. Check out this POST and this VIDEO for a full tutorial.

The Brickroad Table Set includes instructions for coasters and a tea towel that can be worked into place mats or a table runner. Find it free in the Blog!
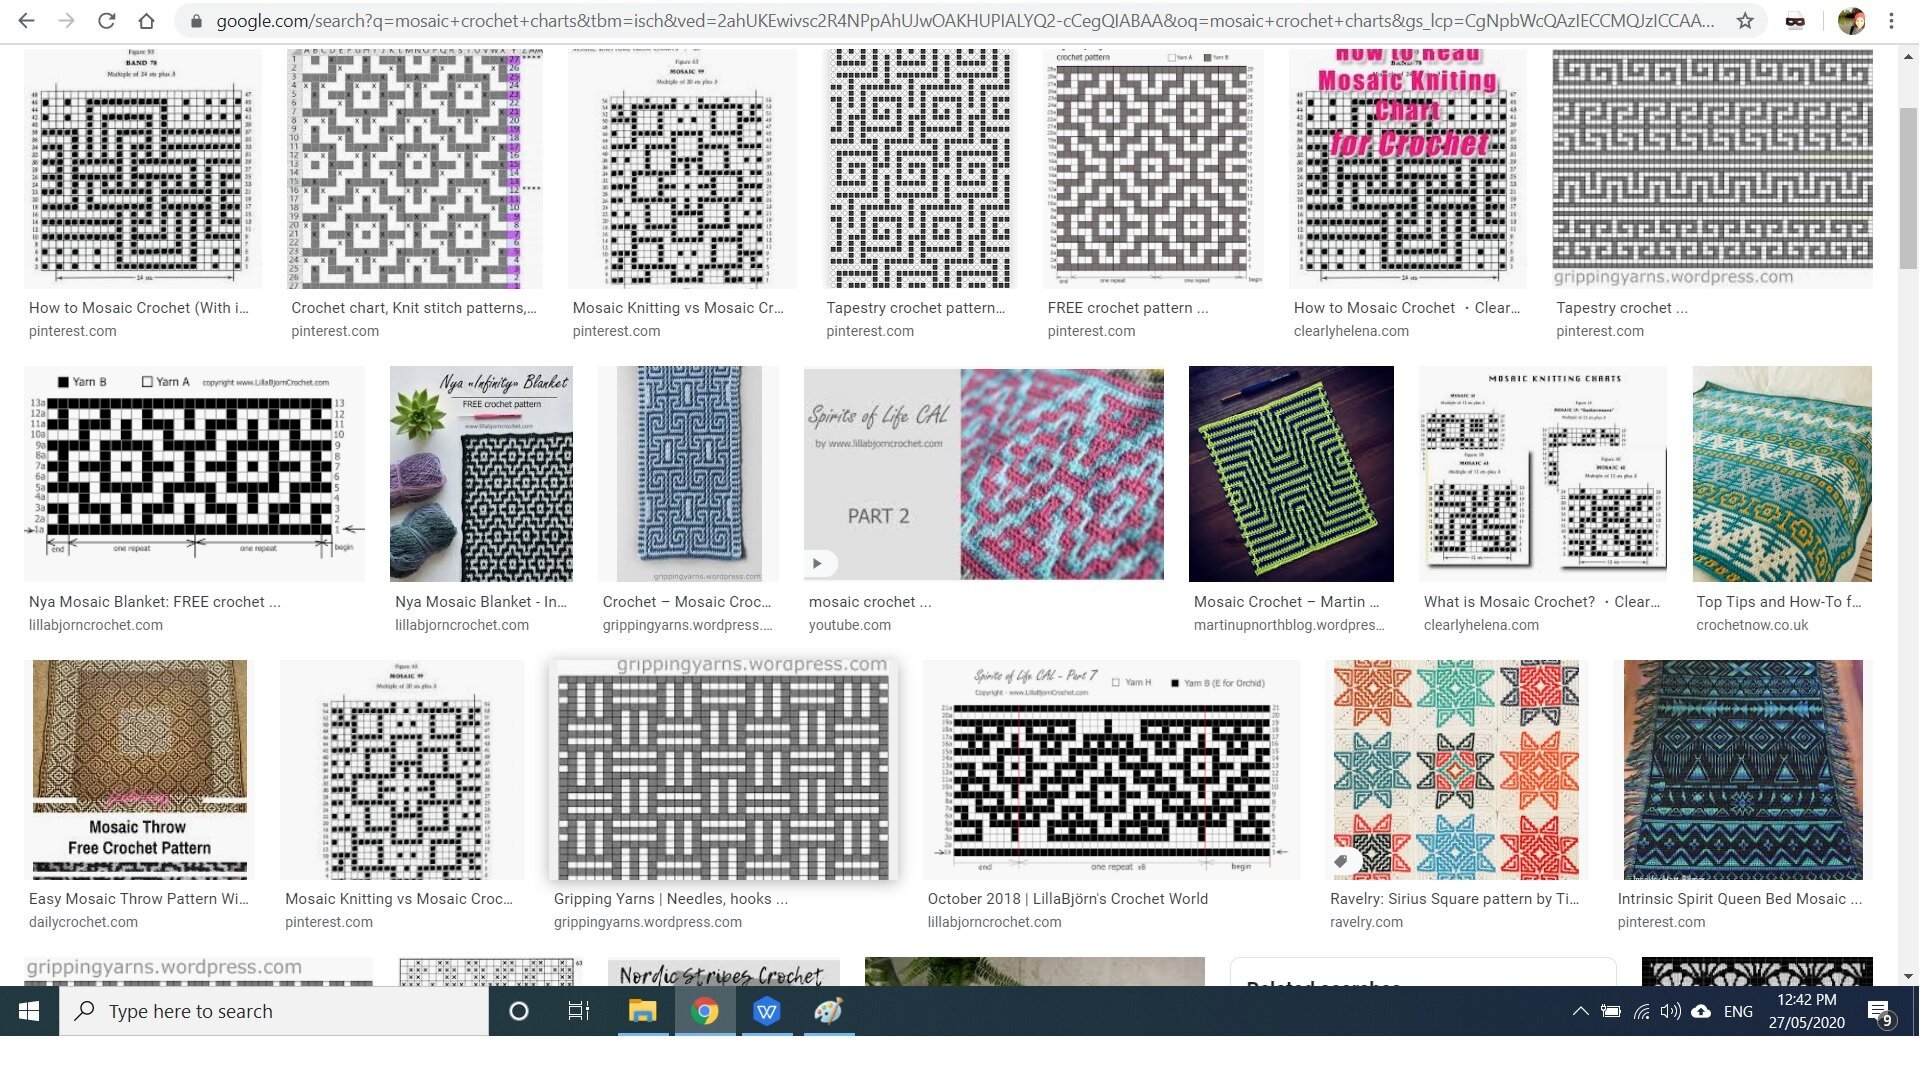
But my main focus today is on the actual charts. There are tons of resources for mosaic knitting, but not so many for crochet.
Actually, here’s a snapshot of google search results when I look up “Mosaic Crochet Charts”. NONE of them, except for one, are actually modified to be worked in crochet! They are all for knitting!
But here’s the thing: It’s so easy to modify a knitting chart and use it for crochet! And I’m going to tell you how!
A little very important side note is that I am in no way condoning plagiarizing other people’s charts and using them as your own! No WAY! If you are a designer and you love the look of a chart online, either give the author credit in your work (like I do in the Brickroad Set) or simply MODIFY the chart to make it your own!
And if you’re feeling brave, then just make your own from scratch! Soon I will add another post on how to make your own Mosaic Crochet Charts. It’s easy, but there are a few rules that you do need to keep in mind.
Let’s get started then.
How to adapt an existing mosaic knitting chart for crochet
If you’re not feeling like reading at the moment, don’t worry. Just skip ahead to the video tutorial!
Step 1
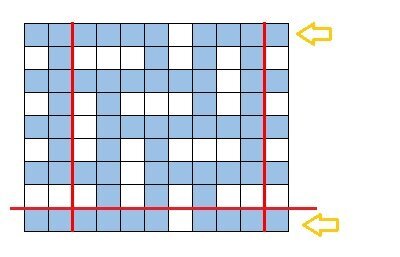
The first thing you need to do is either print out the chart or draw it in a spreadsheet. You should make sure that each cell is square by changing the row height and column width. I usually make them 5x5 mm. I recommend using a color OTHER than black to grey out the contrasting color so that it’s easy to see the Xs that you will add later.
It will look like this:

This chart is the one used in the Brickroad Table Set and was taken from Barbara Walker’s Mosaic Knitting Book.
And don’t forget these important Mosaic Crochet Rules that apply to all different variations:
Each row of the chart is a different color. The color of each row is indicated in the first and last column of the chart.
Each square is one stitch.
You should start your work by working one row in a color that is different from Row 1. So if Row 1 is a Color A row, you should work a Color B row before you start working on the chart.
When working in rounds, you will ONLY work and repeat what’s in between the red lines.
When working flat, you will work every column but ONLY REPEAT what’s in between the red lines.
Step 2
Make a “Base Row” by copying the 1st row (from the bottom) at the top.
The first row will now become your base row. It is different from the other rows because it will not have ANY dc sts and it will ONLY be worked the first time the chart is worked. On following repeats, the base row is OMITTED. That is why it is separated from the rest of the chart with a red line
Step 3
Find where double crochet stitches should go and mark them with an “X”.
Dc’s in mosaic crochet are used to cover the color that is worked underneath them since you work with only one color per row. To find the stitches that need to be covered we need to look at the color of the row and the stitches that are of a different color. The X goes on the square above these stitches.

For example, on the Base Row, which is a Blue row, there is one white square (circled in green)

To cover the blue stitch from the base row, we will add an “X” or dc on the square above this white square.
You will do this for every row, row by row.

On the next row, which is a White Row, there are 3 blue squares. To cover the white stitches that will be worked on that row and make them blue, we add an “X” on the squares above them.
And that’s it! After adding all of the Xs it should look something like this:
This chart has numbers on both sides because it is worked flat and like I said before, each row of the chart represents two rows on your work when worked flat.
However, if you’re working it in circles, then you would only add numbers to the right side of the chart. In which case there would only be 8 rows instead of 16.

Check out this video for further clarification. And now that you know how to adapt your favorite charts, don’t forget to have a read at my posts on Mosaic Crochet in Rounds and Standard Mosaic Crochet for a comprehensive guide on how to use these technique using your adapted charts as well as some super cute FREE patterns!!